
Writer’s Workshop is a writing program for your whole family, from emergent writers right up to Mom and Dad. This is a sample exercise about the parts of speech. Try it with all your kids.
This Writer’s Workshop exercise is from Writer’s Workshop Jump Start, which is the first unit to dig into with your family. In Jump Start, you’ll learn to use the Journal as a place to pour your thoughts out unimpeded, re-wire your thinking to begin expressing yourself with writing rather than seeing it as a chore, and learn to take a piece of writing clear through the writing process to publication. Join us for a family-style writing program in Writer’s Workshop.
As kids begin writing, it’s important to understand the basic parts of speech. Words do jobs for us. Each part of speech does a special job in a sentence. Once we understand those jobs, we can begin to use them to write more clear, descriptive, cohesive sentences.
Step 1 Mini-Lesson
Start each Writer’s Workshop lesson off with a 5-10 minute mini-lesson with all of your kids. The sidebars of each Writer’s Workshop unit are lined with mini-lesson ideas to choose from. For this lesson, you will review pronouns.
Practice coming up with pronouns together. Begin by brainstorming a list of nouns. Together, think of words that could take the place of those nouns.
Tree = it
Byron = he
Shopping carts = them
Lucille and I = we
Jackie = she
Now everyone can write a sentence or two that uses pronouns. Use a highlighter pen to highlight the pronouns you used.
Step 2 Exercise: Parts of Speech Flipbook
Spend most of your Writer’s Workshop time on the exercise, which should last as long or as short as you need it to, day by day.
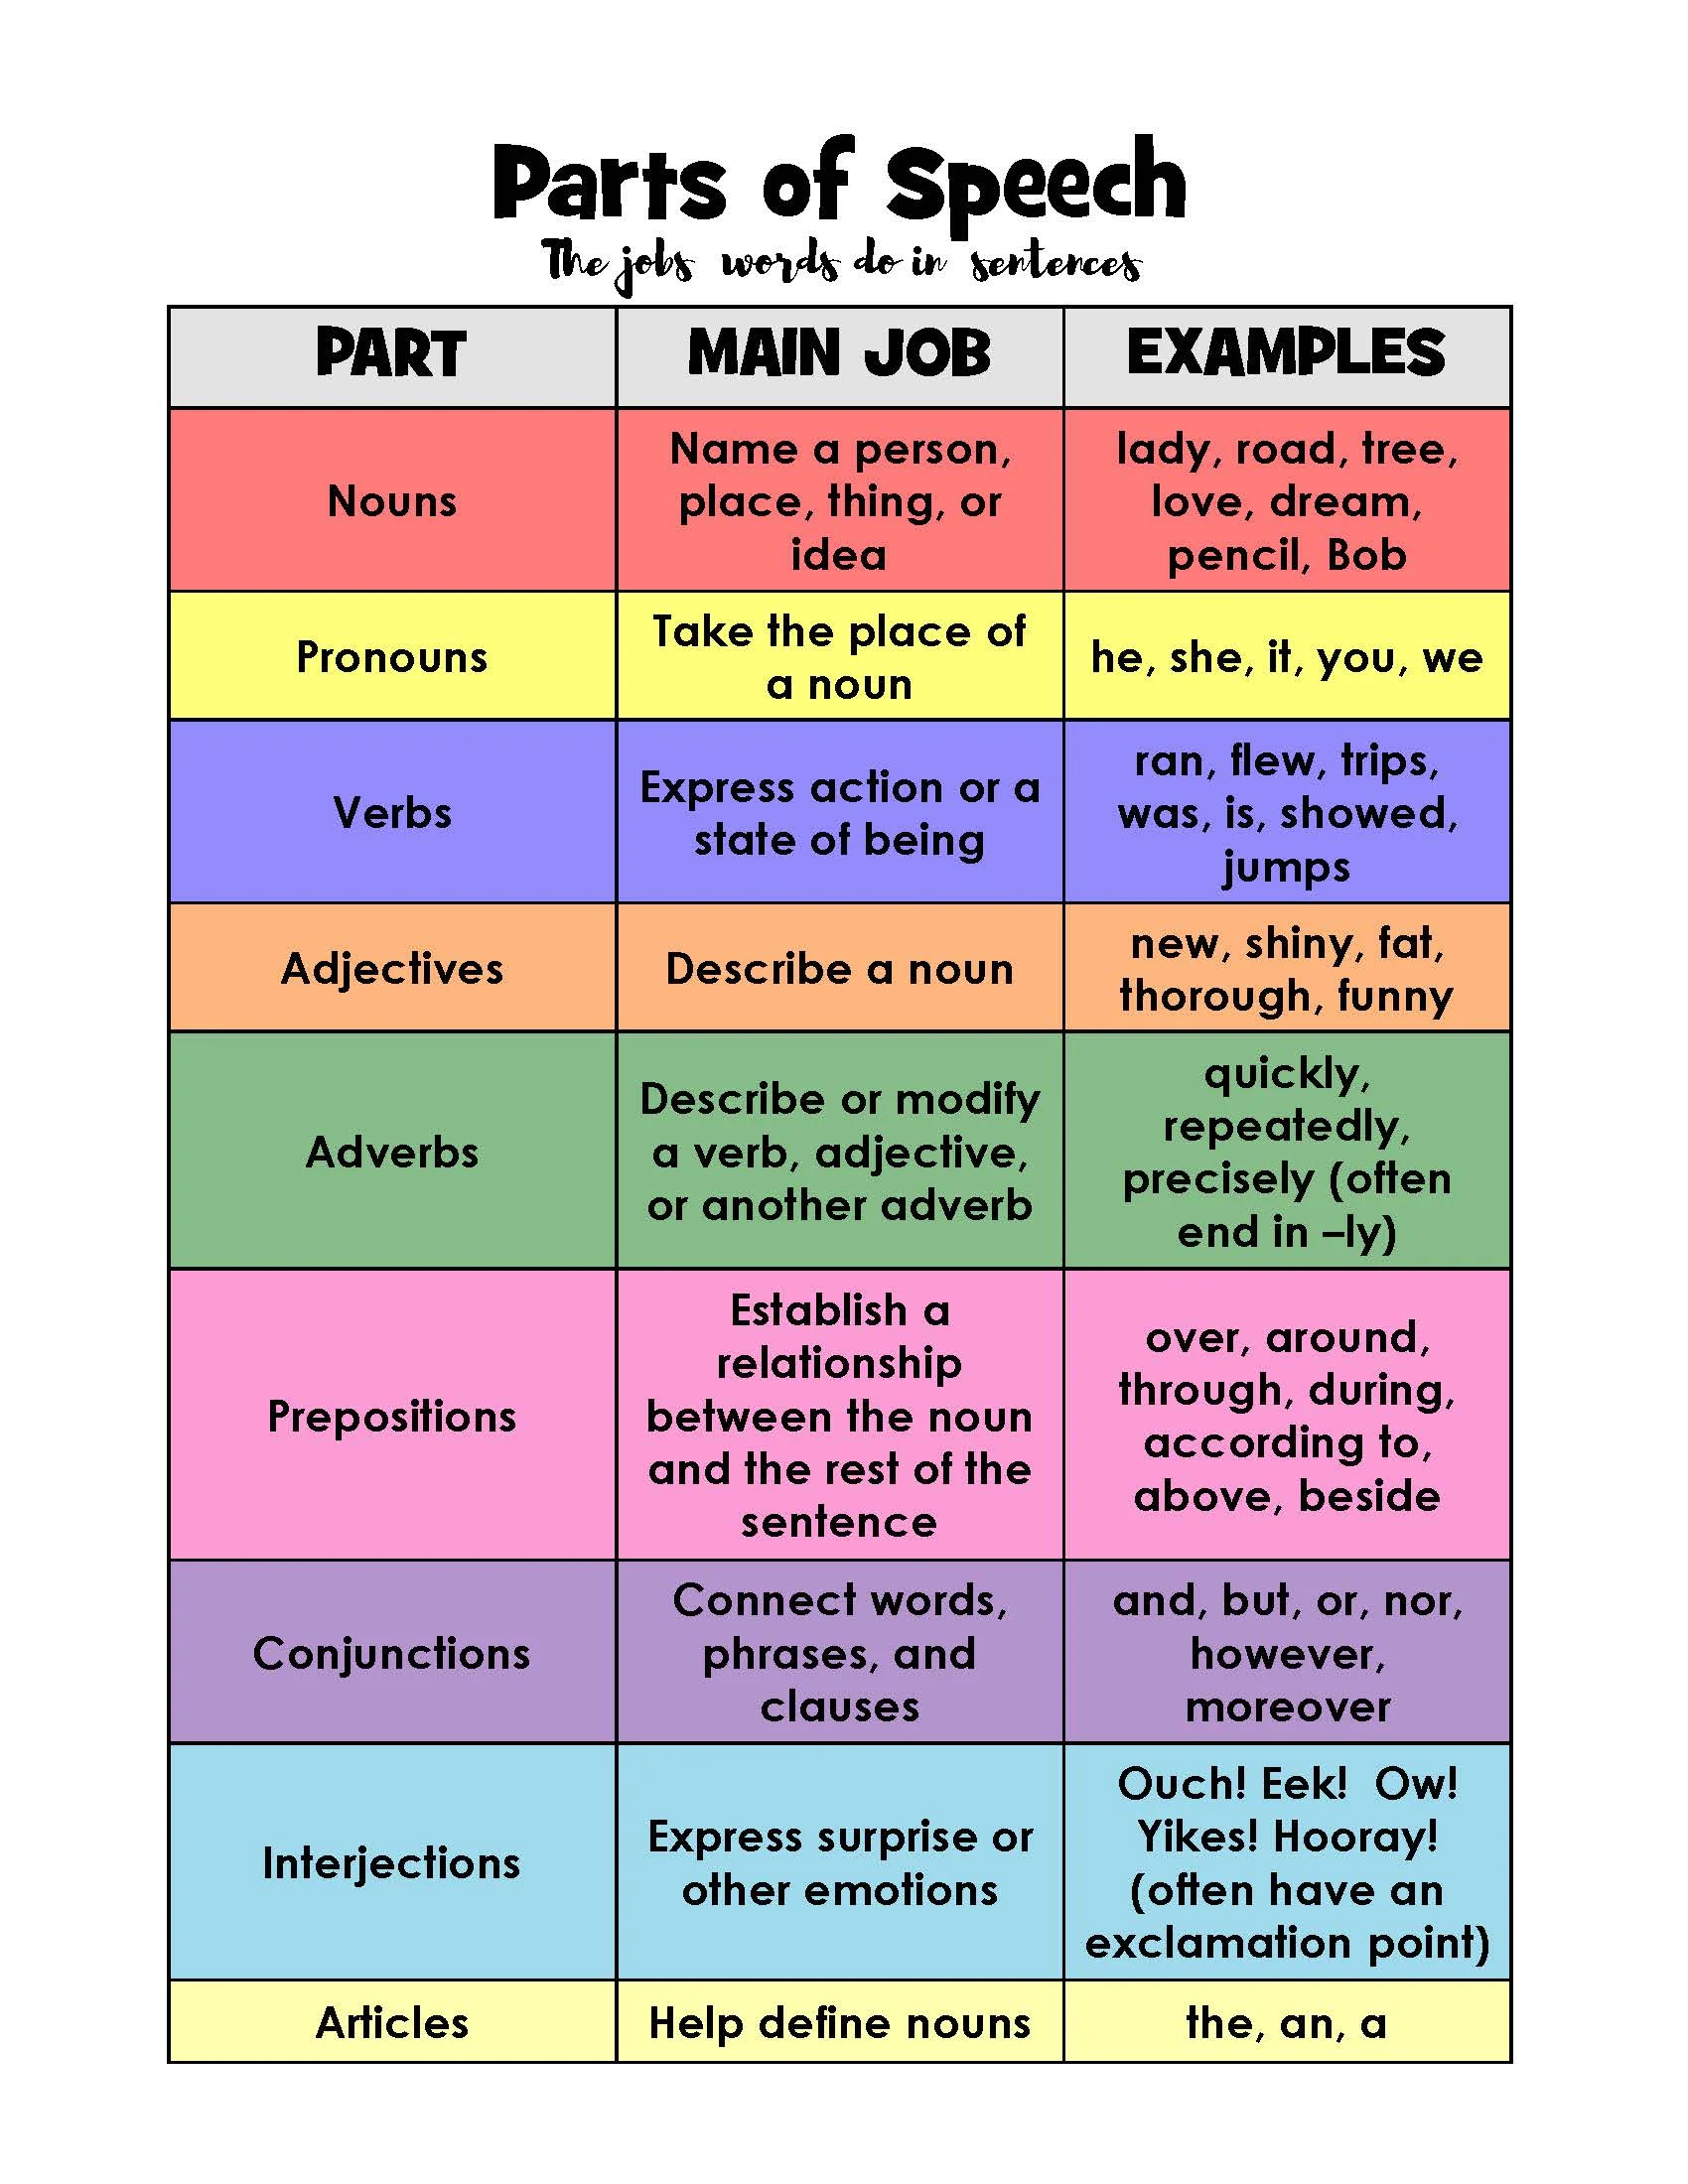
For this exercise, you’ll need construction paper, a ruler, a hole punch, pencils, markers, brads, scissors, and the Parts of Speech printable to use as a reference.
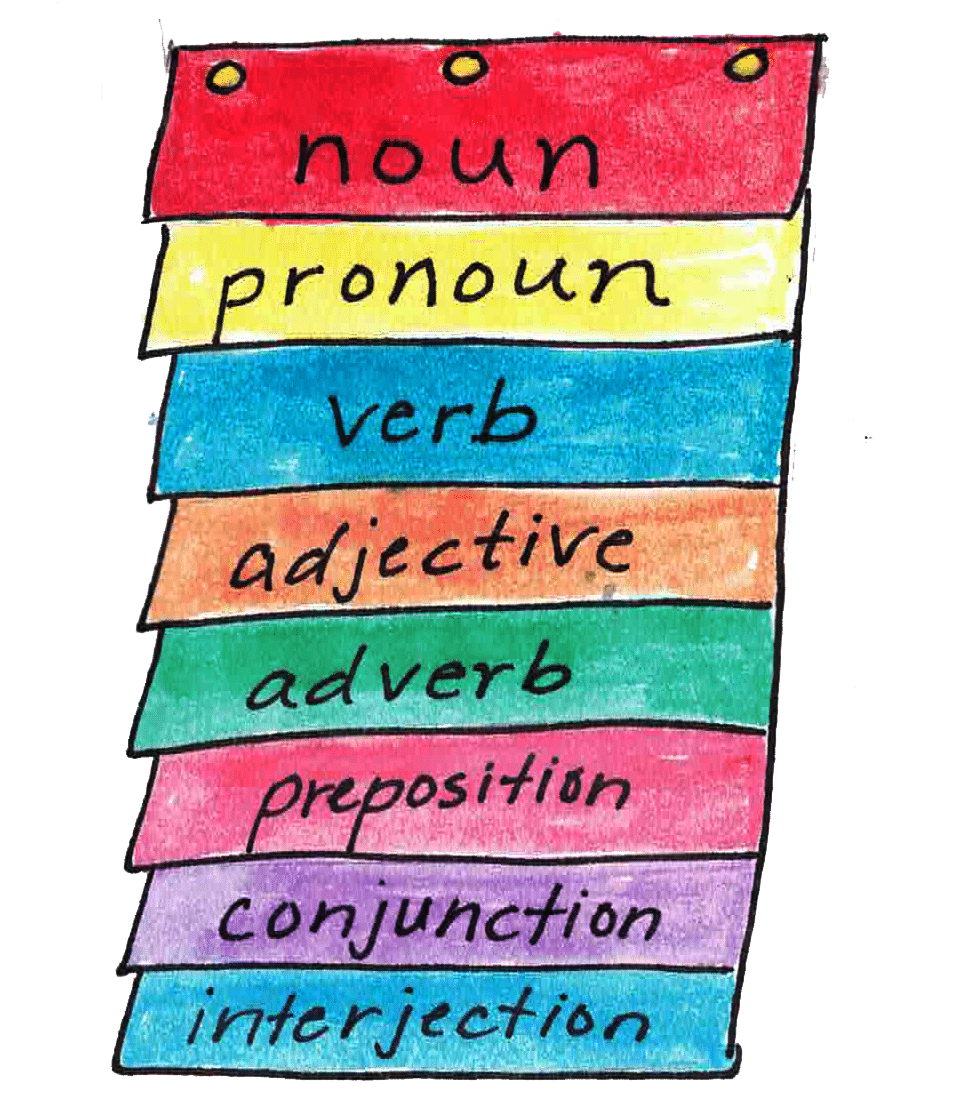
Make a flip book to help you learn each of the parts of speech.
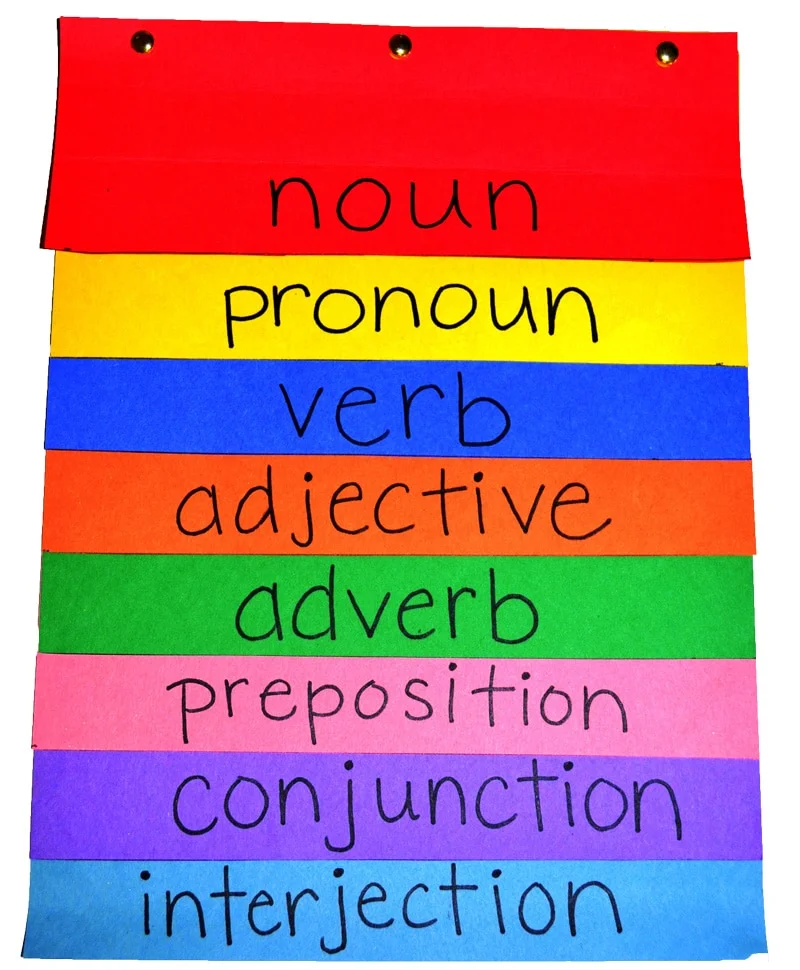
The biggest sheet is a full-size sheet of construction paper. Each page was reduced by one ruler’s width from the one underneath it. Put your ruler down along the bottom edge, trace the edge with a pencil, and then cut along the line. Sharply crease each page so it will easily flip up along the crease mark. Hole punch the top and attach the whole flipbook together with brads.
Use the Parts of Speech printable to define each part of speech. If you want to, you can color-coordinate our printable with our flipbook so visual kids can associate each color with its assigned part of speech. Write example words on each page of the flip book to create a word bank for each part of speech.
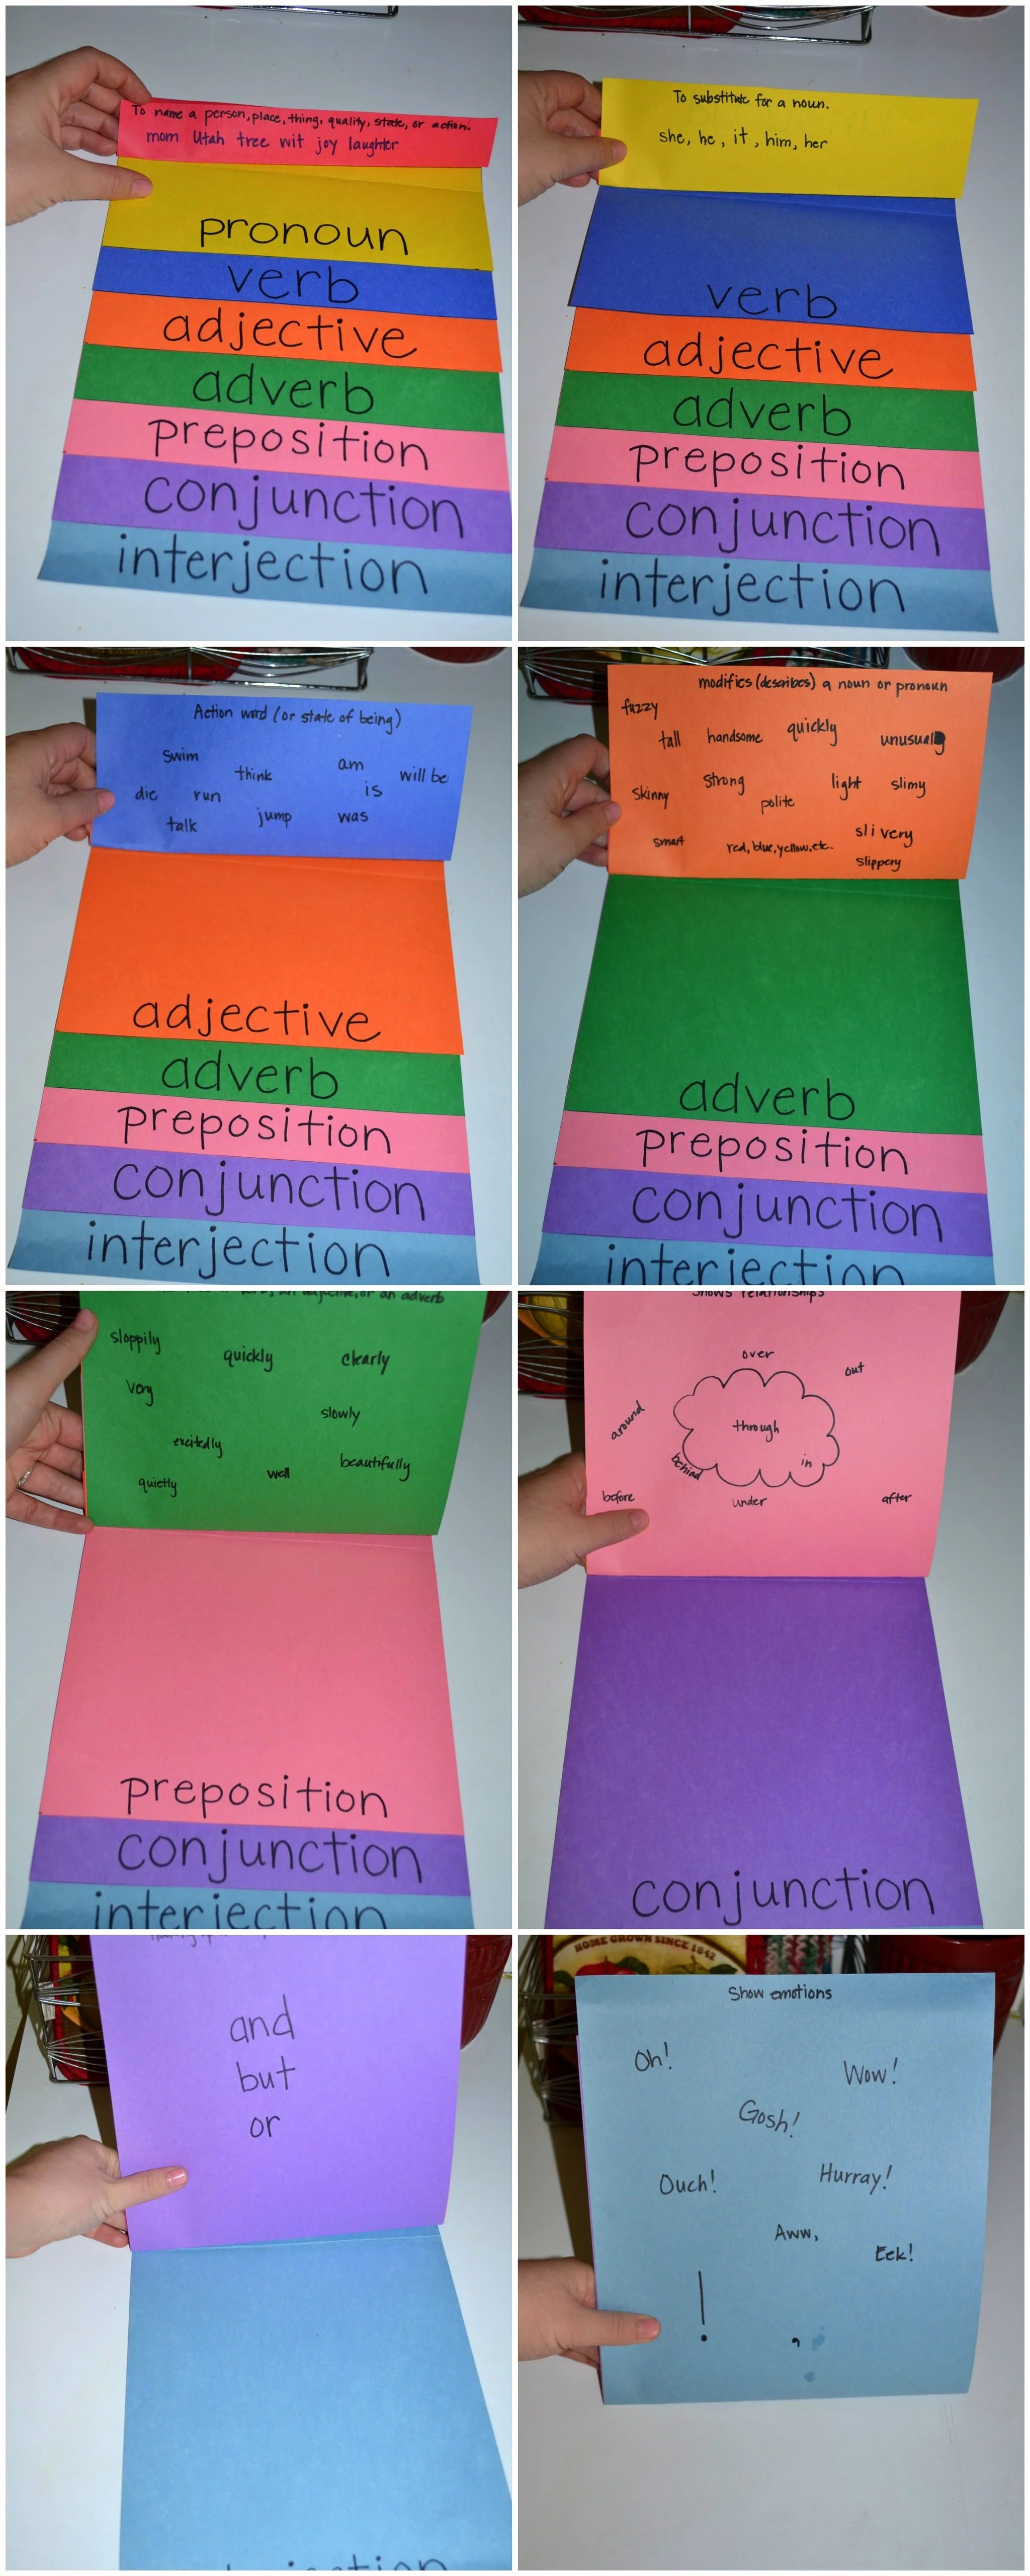
As you come across interesting words, keep adding them to your flipbook. You can keep it on hand as you write to provide a word bank of interesting words. It provides access to vivid words and reminds you to use lots of description and full sentences as you write. You can also use your flipbook to quiz on the parts of speech or help you fill out mad libs for a review of the parts of speech.
Step 3: Writing Project
Most exercises stay in your Writer’s Notebook to be used a reference, inspiration, or to be tossed at a later date, but about once a month, one piece of writing should be taken clear through the writing process. This is your writing project.
As you are working on your writing project this month, keep your Parts of Speech Flip Book at your side. If you find short sentences that lack description, you can remind yourself to throw in a brilliant verb, an adjective, an adverb, and a preposition.
You can learn details about the writing process and how to mentor writers in the Writer’s Workshop Guidebook.
Step 4: Evaluating Writing
Every piece of writing that makes it to publication needs to be shared before an audience and then evaluated. The audience should cheer for the writer and ask curious and positive questions about the writing when appropriate. Evaluations should be designed to help the writer grow, not just to create a grade. Every Writer’s Workshop Unit comes with specific helps for the evaluator including a rubric that is specific to the genre being taught. General writing evaluation criteria and strategies are taught to the parent in the Writer’s Workshop Guidebook.
What You’ll Find in Every Writer’s Workshop Unit
Printables
You’ll find printables in every Writer’s Workshop unit. They are tools for helping kids learn the writing process, skills, and ways to write in specific genres. They make lessons in a family-school setting a little more manageable for parents too.
Ideas Banks
In each unit, kids will be doing a variety of writing exercises as well as one project. They will learn to take their project through the writing process, incorporating what they’ve learned during the exercises. Each unit has a big idea bank for kids to choose from so they can find something meaningful that they get to choose personally in each genre.
Rubrics
Every unit also includes a rubric to help parents or mentors know how to give feedback that will help writers grow. Rubrics are tools writers can use to self-check and mentors can use to know what to look for in each writing genre. We never just slap a grade on writing. Every bit of feedback is a tool to improve and grow.
More Writer’s Workshop
Learn more about Writer’s Workshop and how it can help you create writers (not just grammar workbook filler-outers!). We invite you to check out the Writer’s Workshop Curriculum Guide. Then see how Layers of Learning can change your whole homeschool into a happy, hands-on family school with the Writer’s Workshop Guidebook. We believe learning is about exploring! If you like exploring, you’ll love the rest of the Layers of Learning program too – history, geography, science, and art, all taught with your whole family exploring together.
Get a Free Unit
Choose between the first unit in each Layers of Learning subject to try for free when you sign up for the newsletter.
We never spam and you can cancel your subscription at any time.

I really love these ideas and will be using them as we review this. I really like the flip book idea and also the index card race. One thing that we have done (we use the Waldorf approach, and this is part of that pedagogy) is beginning around the second grade when we first start nouns and verbs (which are introduced at that time as “naming” and “doing” words), we assign a color to each part of speech. Nouns are blue, verbs are red, etc. We use these color codes for all the elementary years when we are doing grammar. So if we are identifying parts of speech in a passage, I would have my child underline them in the appropriate colors. If we are writing something for a grammar exercise, they would write each word in the proper color. This really helps reinforce which words are which, especially as we do this consistently for several years. I’ve had my son write little “poems” by writing first a noun, then the same noun with a verb, then adding an adjective, then an adverb, etc… all in the assigned colors. He got a kick out of coming up with something silly. We have also used movement in our lessons–talking about verbs by having the child think of different verbs and act them out, really reinforcing the idea of a verb as an action word. Adverbs would be great for acting out also. Another thing we recently did was that we were studying Norse Mythology at the same time we were learning about verb tenses. In the Norse Myths, there are three characters called the Three Norns… one is in charge of everything related to the past, one handles everything related to the present, and one knows everything about the future. It was so easy to tie this into learning about past, present, and future tenses, and we explored sentences related to the myths as we were first learning about this topic. We took sentences directly out of the stories we’d read and tried re-stating them according to how each of the Norns would have said it. My son got the concept so easily this way. I highly recommend D’Aulaire’s Norse Myths anyway; they were wildly popular with my son.
So many great ideas! Thanks Lisa! I love the idea of color coding. And we adore D’Aulaire’s Myths. . . a favorite at our house too.
Hi
Montessori philosophy also colour codes 🙂
Hello,
Congratulations ! Il love your work ! I’m a french teacher and I’d like to reuse it with my pupils.
Could you please tell me the name of the jobs ?
( interjection : show emotion etc. )
Thanks a lot !
If you look at the worksheet, it tells you each of the jobs, We used the ideas from the worksheet to make the flipbook.
I like this Idea. What worksheets u r talking about plz?
The parts of speech worksheet is linked to in the post. I’ll relink it here.
What grade would you use this with?
Any age could use this if they haven’t learned it before or for a review or reminder. But usually in 3rd grade the parts of speech would be covered for the first time. Kids who are good readers could learn it earlier. Kids who struggle to read and write could have it delayed a bit.
Great idea…am using it with my sped kids
This is terrific. Have you made them smaller and more portable for older learners? I’m looking to make flip books for teachers working with ELLs as well.
The needs of SPED and ELL are similar even though the causes are different. Thus anything you do for one, should help the other, and the “regular” kids as well.
I haven’t made smaller versions. The worksheet could just be electronically reduced when you print it. The flipbooks are just made of construction paper, so you could craft it to be any size you wanted.
Hi! Not sure if I saw this correctly, but on your examples, quickly and unusually is an adverb, not an adjective.
Thank you for your resource.
Yes, the kids made several mistakes on their flip books. These photos were taken in process as the lesson progressed. You can see that “unusually” was scratched out to be “unusual” and we did continue to make corrections and add lots more words as well over the next lesson or two. Thanks!
Thank you so much for sharing this. It was great fun to put together with our daughter and it will be a great reference for her as she advances in her writing skills.
This is great we Waldorf homeschool and we will definitely be making this and color coordinating it. What a great idea thanks for posting. It would be good to do this for punctuation as well. Each page a different mark.
I use grammar flipcharts every year in my ESL class. My only suggestion is that I have my students write them so that when they see the word adjective on the edge of the paper, all the info above it is about adjectives, not the part of speech introduced before the adjective. That way the visual association is made. For example in the photo above, a student sees the word preposition but the words are adverbs. Since the brain is always searching to make connections, it is helpful that the label and the examples are seen together. Flipbooks are great tool for grammar. Enjoy using them.
That’s a great point Pamela. We frequently use ours as a self-quizzing tool. The kids read the part of speech, and then have to list off a bunch of examples before they flip it over to see if they’re right. I prefer to have them “hidden” for that reason, but otherwise I think your suggestion is terrific. Thanks!
Me encantan estas actividades
Gracias Aida. Me alegro de que te guste.
I love the flip books ! Thanks! Patty
First year homeschooling a second and first grader, I find this post extremely helpful. I’m your newest follower.
Me encantan sus ideas
Me encantan sus ideas .. y las utilizo en mis practicas gracias y espero que me acepten
¡Gracias! Nos alegra que esto haya funcionado para usted.
A fantastic way to teach writing,beats the trouble of reaching for the dictionary.
This is an awesome idea.i love everything about it. I plan to use it for a review with my grandson.
I absolutely love this idea! I am going to use it for my daughter, she is dyslexic, & needs to constantly go over and over the same concept until it eventually sticks in her long term memory. Thank you for the great idea!
I am very interested in the flip book as well as the writing. I teach self contained and always looking for new ideas or ways to present material to my students.
Wow! The parts of Speech flipbook looks amazing and will be so useful for my therapy students. Thank you!
Hi
The flipbook is a wonderful tool for learning. Will introduce it with my grand children
Thank you for such a great idea. I’m planning to get my students to do this at the beginning of the school year next March.
Thanks to others who have given ideas here as well.